
So many plumbing parts must be in place before you can effectively use your sink. One such part is the P-trap with its P or U shape giving it its name. Like most plumbing parts, P-traps also require frequent maintenance to keep them n optimal conditions.
The P-trap is under the sink and often covered with cabinets, staying out of sight but remaining a practical component in your sink setup. It is easy to forget or neglect this fixture due to its position and seemingly limited use.
P-traps are essential; as you’ll see shortly, neglecting these fixtures can prove detrimental. This guide discusses P-traps, how they work, and how you can clean and maintain the pipe.
What is a P-Trap?
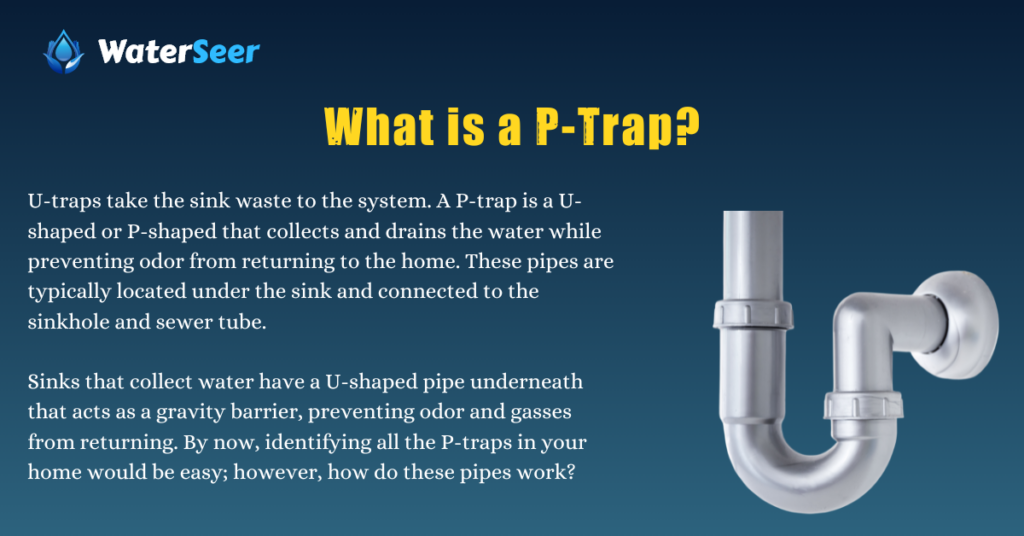
U-traps take the sink waste to the system. A P-trap is a U-shaped or P-shaped that collects and drains the water while preventing odor from returning to the home. These pipes are typically located under the sink and connected to the sinkhole and sewer tube.
Sinks that collect water have a U-shaped pipe underneath that acts as a gravity barrier, preventing odor and gasses from returning. By now, identifying all the P-traps in your home would be easy; however, how do these pipes work?
How do P-Traps Work?
Have you ever wondered what those U-shaped pipes under basins and sinks do? P-traps drain the sink, but their primary use is the prevention of odor and gasses from coming in from the sewer system. These pipes achieve this blockage due to their U-shape that is filled with water. Here’s your chance to learn about its working mechanism and why it is so effective.
The water in the U-shaped section will continue to be replaced by water from the basin while blocking any gas from crossing the seal. The sharp pipe drop and the area being filled with water create the gravity barrier.
The seal will continue to be effective as long as the water remains in the U-section of the pipe. However, sometimes the water in this area dries up, breaking the barrier. It may give rise to unpleasant gasses and odors from the sewer system that can flow into your home.
The water in the U-pipe can dry up in basins that are not always in use. When the water dries up and the smell starts to creep in, running the faucet for a few seconds will flush the fixture and refill the section.
P-traps also collect small particles, usually metal chips, hair, food, and grease, which may clog the pipe over time. While this may still block odor from passing through, it’ll also stop water from the sink from flowing into the sewer system.
Some P-traps are connected to more than one water basin and, as such, can be overloaded with water. An overload occurs when more water tries to go through the pipe than it can take. It often leads to water returning to the sink or a prolonged flow.
How to Clean P-Traps

If you notice the water from the sink drains slowly or a stench coming from the sinkhole, it is time to clean the U-bend. Cleaning U-bends is an easy process that will only take a few minutes once you can remove and replace the pipe. Before you start cleaning, you need a few materials.
Materials for Cleaning P-Trap
- Pliers or adjustable wrench: it may be challenging to turn the coupling nut by hand, so the wrench becomes essential
- Bowl or bucket: this is vital in collecting the sediments or water in the U-bend
- Flexible wire brush: this brush features an adjustable handle so it can bend through the P-trap and clean the insides
Step One: Place a bowl under the P-trap
Even after putting off the sink faucet, water will remain in the bend, creating a mess since the water will most likely contain sediments. Clearing the area under the sink will give you room to work, including removing any under-sink water filter that may obstruct your access to the P-trap. Place a bowl or bucket under the P-trap to collect any water or sediments that will drip off.
Step Two: Remove the P-trap
Use pliers or an adjustable wrench to loosen the P-trap’s coupling nut by placing the grip around it and turning it anticlockwise. After a few turns, you can complete the removal by turning with your hands. Repeat the process of uncoupling the nuts on either end of the U-blend.
After uncoupling the nuts, carefully remove the plumber’s trap and turn its content into the bowl to avoid spillage. Depending on how full the bend is, water can come gushing out when you loosen the nuts, so wrapping it with a cloth while removing it will help prevent the water from splashing.
Step Three: Clean the P-trap
Ensure to dump the water and contents of the P-trap inside the bucket to give you room to clean the pipe properly. With the help of the flexible wire brush, you can clean this plumbing fixture. You want to remove solid waste like hair and sediments before scrubbing the insides.
Due to the moist nature of this fixture, mold, mildew, and grime are standard features inside the tube. Use the adjustable wire brush to scrub and push out debris and dirt. Wet the brush and slide it through the pipe, scrubbing every inch of the insides.
Step Four: Re-attach the P-trap
Re-attach the U-bend to the kitchen sink and sewer tubes using the coupling nuts. Tighten the nuts by turning them clockwise until tight before using the pliers or adjustable wrench. Make only a half-turn with these tools, as you want to avoid over-tightening the nuts or damaging the thread. Over-tightening can damage plastic nuts.
Ensure there are no leakages by turning the faucet on and allowing water to flow into the trap. When the fixture is correctly sealed, you can empty the bowl’s contents and clean any spillage.
Types of P-Traps
P-traps are classified based on different factors, with the material being one such classification. There are two primary types of P-traps based on the material.
- Polypropylene: This plastic P-trap will not corrode nor react with acid. Although it is not the most appealing trap, it is lightweight and easy to attach.
- Brass: brass traps are chrome plated to reveal an aesthetically pleasing fixture. However, its coatings and materials make corrosion possible and a likely reaction with acids.
Tips for Cleaning P-Traps
Here are some quick tips to try before, during, and after cleaning the U-bend for optimal usage:
- Pour boiling water through the P-trap to try unblocking the clogged space. Sometimes boiling water can loosen sediments and make it possible for the water to start flowing normally again.
- Use a plunger through the sinkhole to clean the P-trap before removing the fixture. Put the plunger inside the hoe and pull it out quickly to remove some of the debris blocking the trap.
- Avoid over-tighten the coupling nuts as well as other home plumbing fixtures.
FAQs
Do you have some questions you would like answered about cleaning P-traps? Here are some common questions and their answers:
How often should I clean my P-trap?
To ensure a smooth flow and an odorless home, clean the P-trap every three months. Observe the area to know when the water flow rate from the sink has dropped or the place stinks of sewer waste.
What are the signs to know when my P-trap needs cleaning?
A reduced flow rate away from the basin or a smelly area may indicate a clogged or dry P-trap that needs cleaning.
Why is it called a P-trap?
Its name is derived from its use as it joins two 90-degree pipes with a sudden bend. The idea of the letter P is visible in the joint.
Summary
Cleaning a P-trap is easy and would not need plumbers if you have a little time. When the area around a basin begins to stink, you most likely have a P-trap problem, with solutions ranging from running the faucet for a few seconds to removing and cleaning the P-trap.